Getting Started
This page will help you install and build your first React Native app. If you already have React Native installed, you can skip ahead to the Tutorial.
- Quick Start
- Building Projects with Native Code
Create React Native App is the easiest way to start building a new React Native application. It allows you to start a project without installing or configuring any tools to build native code - no Xcode or Android Studio installation required (see Caveats).
Assuming that you have Node installed, you can use npm to install the create-react-native-app command line utility:
npm install -g create-react-native-app
Then run the following commands to create a new React Native project called "AwesomeProject":
create-react-native-app AwesomeProject

cd AwesomeProject
npm start
This will start a development server for you.
Running your React Native application
Install the Expo client app on your iOS or Android phone and connect to the same wireless network as your computer. On Android, use the Expo app to scan the QR code from your terminal to open your project. On iOS, follow on-screen instructions to get a link.
Modifying your app
Now that you have successfully run the app, let's modify it. Open App.js in your text editor of choice and edit some lines. The application should reload automatically once you save your changes.
That's it!
Congratulations! You've successfully run and modified your first React Native app.

Now what?
Create React Native App also has a user guide you can reference if you have questions specific to the tool.
If you can't get this to work, see the Troubleshooting section in the README for Create React Native App.
If you're curious to learn more about React Native, continue on to the Tutorial.
Running your app on a simulator or virtual device
Create React Native App makes it really easy to run your React Native app on a physical device without setting up a development environment. If you want to run your app on the iOS Simulator or an Android Virtual Device, please refer to the instructions for building projects with native code to learn how to install Xcode and set up your Android development environment.
Once you've set these up, you can launch your app on an Android Virtual Device by running npm run android, or on the iOS Simulator by running npm run ios (macOS only).
Caveats
Because you don't build any native code when using Create React Native App to create a project, it's not possible to include custom native modules beyond the React Native APIs and components that are available in the Expo client app.
If you know that you'll eventually need to include your own native code, Create React Native App is still a good way to get started. In that case you'll just need to "eject" eventually to create your own native builds. If you do eject, the "Building Projects with Native Code" instructions will be required to continue working on your project.
Create React Native App configures your project to use the most recent React Native version that is supported by the Expo client app. The Expo client app usually gains support for a given React Native version about a week after the React Native version is released as stable. You can check this document to find out what versions are supported.
If you're integrating React Native into an existing project, you'll want to skip Create React Native App and go directly to setting up the native build environment. Select "Building Projects with Native Code" above for instructions on configuring a native build environment for React Native.
Follow these instructions if you need to build native code in your project. For example, if you are integrating React Native into an existing application, or if you "ejected" from Create React Native App, you'll need this section.
The instructions are a bit different depending on your development operating system, and whether you want to start developing for iOS or Android. If you want to develop for both iOS and Android, that's fine - you just have to pick one to start with, since the setup is a bit different.
Unsupported
A Mac is required to build projects with native code for iOS. You can follow the Quick Start to learn how to build your app using Create React Native App instead.
Installing dependencies
You will need Node, Watchman, the React Native command line interface, and Xcode.
While you can use any editor of your choice to develop your app, you will need to install Xcode in order to set up the necessary tooling to build your React Native app for iOS.
Installing dependencies
You will need Node, Watchman, the React Native command line interface, a JDK, and Android Studio.
Installing dependencies
You will need Node, the React Native command line interface, a JDK, and Android Studio.
Installing dependencies
You will need Node, the React Native command line interface, Python2, a JDK, and Android Studio.
While you can use any editor of your choice to develop your app, you will need to install Android Studio in order to set up the necessary tooling to build your React Native app for Android.
Node, Watchman
We recommend installing Node and Watchman using Homebrew. Run the following commands in a Terminal after installing Homebrew:
brew install node
brew install watchman
If you have already installed Node on your system, make sure it is Node 8 or newer.
Watchman is a tool by Facebook for watching changes in the filesystem. It is highly recommended you install it for better performance.
Node
Follow the installation instructions for your Linux distribution to install Node 8 or newer.
Node, Python2, JDK
We recommend installing Node and Python2 via Chocolatey, a popular package manager for Windows.
React Native also requires a recent version of the Java SE Development Kit (JDK), as well as Python 2. Both can be installed using Chocolatey.
Open an Administrator Command Prompt (right click Command Prompt and select "Run as Administrator"), then run the following command:
choco install -y nodejs.install python2 jdk8
If you have already installed Node on your system, make sure it is Node 8 or newer. If you already have a JDK on your system, make sure it is version 8 or newer.
You can find additional installation options on Node's Downloads page.
The React Native CLI
Node comes with npm, which lets you install the React Native command line interface.
Run the following command in a Terminal:
npm install -g react-native-cli
If you get an error like
Cannot find module 'npmlog', try installing npm directly:curl -0 -L https://npmjs.org/install.sh | sudo sh.
The React Native CLI
Node comes with npm, which lets you install the React Native command line interface.
Run the following command in a Command Prompt or shell:
npm install -g react-native-cli
If you get an error like
Cannot find module 'npmlog', try installing npm directly:curl -0 -L https://npmjs.org/install.sh | sudo sh.
Xcode
The easiest way to install Xcode is via the Mac App Store. Installing Xcode will also install the iOS Simulator and all the necessary tools to build your iOS app.
If you have already installed Xcode on your system, make sure it is version 8 or higher.
Command Line Tools
You will also need to install the Xcode Command Line Tools. Open Xcode, then choose "Preferences..." from the Xcode menu. Go to the Locations panel and install the tools by selecting the most recent version in the Command Line Tools dropdown.

Java Development Kit
React Native requires a recent version of the Java SE Development Kit (JDK). Download and install JDK 8 or newer if needed.
Android development environment
Setting up your development environment can be somewhat tedious if you're new to Android development. If you're already familiar with Android development, there are a few things you may need to configure. In either case, please make sure to carefully follow the next few steps.
1. Install Android Studio
Download and install Android Studio. Choose a "Custom" setup when prompted to select an installation type. Make sure the boxes next to all of the following are checked:
Android SDKAndroid SDK PlatformPerformance (Intel ® HAXM)Android Virtual Device
Android SDKAndroid SDK PlatformAndroid Virtual Device
Then, click "Next" to install all of these components.
If the checkboxes are grayed out, you will have a chance to install these components later on.
Once setup has finalized and you're presented with the Welcome screen, proceed to the next step.
2. Install the Android SDK
Android Studio installs the latest Android SDK by default. Building a React Native app with native code, however, requires the Android 6.0 (Marshmallow) SDK in particular. Additional Android SDKs can be installed through the SDK Manager in Android Studio.
The SDK Manager can be accessed from the "Welcome to Android Studio" screen. Click on "Configure", then select "SDK Manager".


The SDK Manager can also be found within the Android Studio "Preferences" dialog, under Appearance & Behavior → System Settings → Android SDK.
Select the "SDK Platforms" tab from within the SDK Manager, then check the box next to "Show Package Details" in the bottom right corner. Look for and expand the Android 6.0 (Marshmallow) entry, then make sure the following items are all checked:
Google APIsAndroid SDK Platform 23Intel x86 Atom_64 System ImageGoogle APIs Intel x86 Atom_64 System Image


Next, select the "SDK Tools" tab and check the box next to "Show Package Details" here as well. Look for and expand the "Android SDK Build-Tools" entry, then make sure that 23.0.1 is selected.


Finally, click "Apply" to download and install the Android SDK and related build tools.


3. Configure the ANDROID_HOME environment variable
The React Native tools require some environment variables to be set up in order to build apps with native code.
Add the following lines to your $HOME/.bash_profile config file:
export ANDROID_HOME=$HOME/Library/Android/sdk
export PATH=$PATH:$ANDROID_HOME/tools
export PATH=$PATH:$ANDROID_HOME/tools/bin
export PATH=$PATH:$ANDROID_HOME/platform-tools
export ANDROID_HOME=$HOME/Android/Sdk
export PATH=$PATH:$ANDROID_HOME/tools
export PATH=$PATH:$ANDROID_HOME/tools/bin
export PATH=$PATH:$ANDROID_HOME/platform-tools
.bash_profileis specific tobash. If you're using another shell, you will need to edit the appropriate shell-specific config file.
Type source $HOME/.bash_profile to load the config into your current shell. Verify that ANDROID_HOME has been added to your path by running echo $PATH.
Please make sure you use the correct Android SDK path. You can find the actual location of the SDK in the Android Studio "Preferences" dialog, under Appearance & Behavior → System Settings → Android SDK.
Open the System pane under System and Security in the Windows Control Panel, then click on Change settings.... Open the Advanced tab and click on Environment Variables.... Click on New... to create a new ANDROID_HOME user variable that points to the path to your Android SDK:

The SDK is installed, by default, at the following location:
c:\Users\YOUR_USERNAME\AppData\Local\Android\Sdk
You can find the actual location of the SDK in the Android Studio "Preferences" dialog, under Appearance & Behavior → System Settings → Android SDK.
Open a new Command Prompt window to ensure the new environment variable is loaded before proceeding to the next step.
Watchman (optional)
Follow the Watchman installation guide to compile and install Watchman from source.
Watchman is a tool by Facebook for watching changes in the filesystem. It is highly recommended you install it for better performance, but it's alright to skip this if you find the process to be tedious.
Creating a new application
Use the React Native command line interface to generate a new React Native project called "AwesomeProject":
react-native init AwesomeProject
This is not necessary if you are integrating React Native into an existing application, if you "ejected" from Create React Native App, or if you're adding iOS support to an existing React Native project (see Platform Specific Code).
Creating a new application
Use the React Native command line interface to generate a new React Native project called "AwesomeProject":
react-native init AwesomeProject
This is not necessary if you are integrating React Native into an existing application, if you "ejected" from Create React Native App, or if you're adding Android support to an existing React Native project (see Platform Specific Code).
Preparing the Android device
You will need an Android device to run your React Native Android app. This can be either a physical Android device, or more commonly, you can use an Android Virtual Device which allows you to emulate an Android device on your computer.
Either way, you will need to prepare the device to run Android apps for development.
Using a physical device
If you have a physical Android device, you can use it for development in place of an AVD by plugging it in to your computer using a USB cable and following the instructions here.
Using a virtual device
You can see the list of available Android Virtual Devices (AVDs) by opening the "AVD Manager" from within Android Studio. Look for an icon that looks like this:

If you have just installed Android Studio, you will likely need to create a new AVD. Select "Create Virtual Device...", then pick any Phone from the list and click "Next".


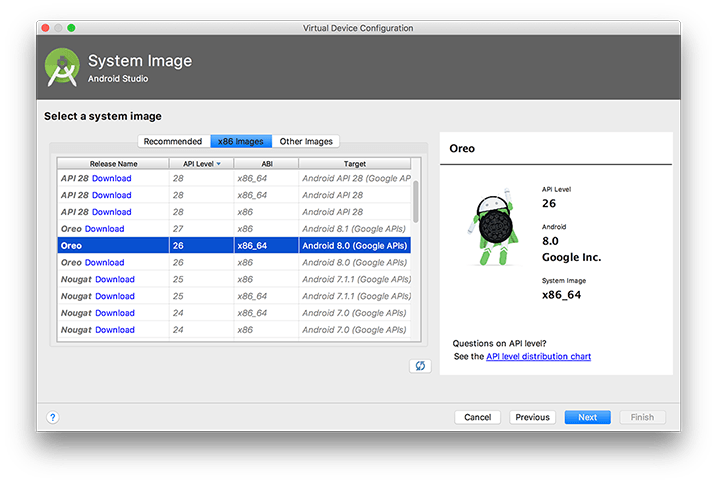
Select the "x86 Images" tab, then look for the Marshmallow API Level 23, x86_64 ABI image with a Android 6.0 (Google APIs) target.
We recommend configuring VM acceleration on your system to improve performance. Once you've followed those instructions, go back to the AVD Manager.

If you don't have HAXM installed, click on "Install HAXM" or follow these instructions to set it up, then go back to the AVD Manager.

If you don't have HAXM installed, follow these instructions to set it up, then go back to the AVD Manager.

Click "Next" then "Finish" to create your AVD. At this point you should be able to click on the green triangle button next to your AVD to launch it, then proceed to the next step.
Running your React Native application
Run react-native run-ios inside your React Native project folder:
cd AwesomeProject
react-native run-ios
You should see your new app running in the iOS Simulator shortly.

react-native run-ios is just one way to run your app. You can also run it directly from within Xcode or Nuclide.
If you can't get this to work, see the Troubleshooting page.
Running on a device
The above command will automatically run your app on the iOS Simulator by default. If you want to run the app on an actual physical iOS device, please follow the instructions here.
Running your React Native application
Run react-native run-android inside your React Native project folder:
cd AwesomeProject
react-native run-android
If everything is set up correctly, you should see your new app running in your Android emulator shortly.


react-native run-android is just one way to run your app - you can also run it directly from within Android Studio or Nuclide.
If you can't get this to work, see the Troubleshooting page.
Modifying your app
Now that you have successfully run the app, let's modify it.
- Open
App.jsin your text editor of choice and edit some lines. - Hit
⌘Rin your iOS Simulator to reload the app and see your changes!
- Open
App.jsin your text editor of choice and edit some lines. - Press the
Rkey twice or selectReloadfrom the Developer Menu (⌘M) to see your changes!
Modifying your app
Now that you have successfully run the app, let's modify it.
- Open
App.jsin your text editor of choice and edit some lines. - Press the
Rkey twice or selectReloadfrom the Developer Menu (Ctrl + M) to see your changes!
That's it!
Congratulations! You've successfully run and modified your first React Native app.
That's it!
Congratulations! You've successfully run and modified your first React Native app.
Now what?
Turn on Live Reload in the Developer Menu. Your app will now reload automatically whenever you save any changes!
If you want to add this new React Native code to an existing application, check out the Integration guide.
If you're curious to learn more about React Native, continue on to the Tutorial.
© 2015–2018 Facebook Inc.
Licensed under the Creative Commons Attribution 4.0 International Public License.
https://facebook.github.io/react-native/docs/getting-started